TwinLite Polycarbonate Roofing Installation

VIDEO TWINLITE POLYCARBONATE ROOFING GUIDE

TWINLITE GEN 2.0

TWINLITE GRECA

INSTALLATION

This is the basic information on the installation of TwinLite® – multiwall polycarbonate roofing sheet. Please read and follow the installation’s instruction carefully before starting. For more detail information, please refer to Twinlite® manual installation book.

01 GENERAL

  • Always install TwinLite® sheets with Ultra Violet (UV)
    protected surface facing the sun. Ensure that the labeled
    side of the sheet is identified before installation.
  • Please ensure to remove the masking film from TwinLite®
    sheets after installation to prevent the masking film sticking
    to the sheet due to the heat exposure from sunlight.

CAUTION: Misplacing the UV side will void the warranty of the sheet.

UV Side Protected Surface Facing the Sun

02 CUTTING THE SHEET

Metal shears, a fine tooth saw, a circular saw with fine pitch blade. However in cutting phase, it would be better to use a cutter. Lay this sheet on a flat surface and care should also be taken to avoid scratching the sheets when handling.

Memotong lembaran menggunakan cutter

03 EXPANSION ALOWNESS

TwinLite® sheets are installed with rust proof fasteners and weather seals for each bar structures. Holes should be drilled at the range of 2 mm from the diameter of fasteners as this allows for thermal expansion during noontime and contraction at night. The number of fasteners used should be in accordance with the specification of the profile being used.

Lubang dibor dengan posisi tegak 90o
Penggunaan pengencang anti karat dan tahan cuaca

04 EDGES SEALING

Sealing the open-ended channels is very important since moisture build-up and dust contamination inside the channels can be a major problem.

  • Seal the top end channels with an impermeable
    tape, while bottom end channels sealed with a
    perforated filter tape.
  • Additional `U’ profile covering perforated bottom
    tape
  • Care should be taken to provide a clearance between
    both sheet edges and sash platform to allow for
    condensation drainage.
Ujung lembaran ditutup dengan selotip

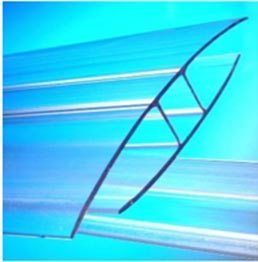
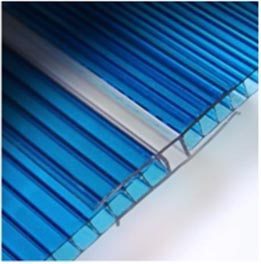
05 JOINING THE SHEETS

Using H Polycarbonate Profile
You can use H profile made of polycarbonate sheet or aluminium.

joining-th-sheetjoining-th-sheet-1

Menggunakan profil H Aluminium

06 GASKETS

Neoprene, TPE, or EPDM rubbers with an approximate shore hardness of A65 are recommended for their compatibility.

NEVER USE PVC gaskets. PVC is incompatible with polycarbonate, and will harm the panel. Damage caused by this will nullify the warranty.

07 SEALANTS

Prior to using sealant, please ensure their chemical compatibility with polycarbonate.

08 POSITIONING THE SHEETS

Prior to using sealant, please ensure their chemical compatibility with polycarbonate.TwinLite® sheets should be installed with the rib in the direction of the slope (flat), vertical (partition), or following the direction of the arched rafters (dome). This position reduces accumulation of dirt inside the sheet and ease gravity drainage of condensation moisture.

Pemasangan mengikuti arah lengkungan (kubah)

For the sheets installed in the clamped, horizontal position, (Roofs, overhead skylight), a minimum slope of 5 percent is recommended. Steeper slope offer better rainwater drainage and self cleaning, and lessen the risk of water and dirt filtration through the connectors and fastening screw. They also help to diminish the visual effect of sheet deflection due to the loads.

Pemasangan searah dengan lereng (rata)

09 ARCHED INSTALLATION

The following is the recommended the sheet’s radius of arched storage and installation.

Pemasangan polycarbonate yang direkomendasikan

10 CLEANING

Should cleaning be required, simply wet the sheet with water, use a mild household detergent, a soft clean cloth or soft sponges, then hose off. Only use regular non-alkaline soaps.

CAUTION: Please avoid the usage of thinner,gasoline or strong acids.

COMPONENTS

  • Sealant Neutral Clear OCI N192
  • Sealant Gun
  • Aerotape
  • Karpet Flashing
  • Baut 70mm + karet seal yang dianjurkan
  • Bor Listrik
  • Mata Roofing
  • Cutter dan Gunting
  • Palu Karet
  • Rol Kabel
  • Tangga
  • Sarung Tangan
  • Kacamata / Google
  • Helm
  • Wearpack

01 JARAK PURLIN

  • Purlin pertama dan terakhir berjarak 700 – 850 mm dari purlin berikutnya.
  • Jarak purlin atau reng berikutnya adalah 1000 mm setelah purlin pertama dan sebelum purlin terakhir. Sedangkan lebar purlin atau reng bebas. (lihat gambar 1)
  • Agar air hujan mengalir ke bawah dengan baik, sudut kemiringan atap yang dianjurkan adalah 5o minimum.
jarak purlin reng atap kanopi twinlite greca
spesifikasi ukuran twinlite greca
Spesifikasi Ukuran Twinlite Greca

02 POSISI LEMBARAN

  • 1 lembar Twinlite Greca memiliki lebar efektif 820 mm, panjang 6000 mm dan jumlah gelombang 5.
  • Selalu memasang lembaran TwinLite Greca dengan permukaan Ultra Violet (UV) menghadap sinar matahari. Pastikan memperhatikan sisi berlabel pada lembaran sebelum pemasangan. Permukaan UV ditandai dengan label UV SIDE.
  • Pastikan posisi lembaran yang berlabel sticker Twinlite Greca menghadap ke atas. (lihat gambar 3)

PERHATIAN: Garansi tidak berlaku jika pemasangan terbalik.

cara pasang kanopi twinlite greca sticker menghadap ke atas

03 PASANG AEROTAPE

Pasang aerotape di setiap rangka sebagai alas redam suara Twinlite Greca. (lihat gambar 4)

pasang polycarbonate kanopi twinlite greca aerotape pada rangka

04 JARAK OVERHANG & SAMBUNGAN

Angkat lembaran Twinlite Greca ke atas rangka. Pastikan sisi overlap atas atau bagian yang lebih lebar terpasang di sisi bagian luar dari rangka. Atur jarak overhang depan serta samping maksimal 150 mm depan dan satu gelombang ke samping. (lihat gambar 5)

Pastikan bagian terpanjang EZ-FIX System berada di atas sambungan. Panjang jarak sambungan sisi panjang (length overlap) yang disarankan adalah 200mm untuk atap yang landai dan 150mm untuk atap yang lebih curam.

pasang polycarbonate kanopi twinlite greca

05 PEMASANGAN BAUT/PAKU

Gunakan selalu baut/paku berkepala yang dilengkapi dengan karet pelindung. Buat lubang dengan diameter 2 – 3 mm lebih besar dari ukuran baut. (lihat gambar 6)

Hal ini dilakukan untuk menyediakan ruang pemuaian karena adanya perbedaan suhu di siang dan malam hari.

cara pemasangan kanopi twinlite greca pasang baut

Lakukan pembautan di sisi depan, dimulai dari gelombang kedua, ketiga dan keempat. Pemasangan baut di purlin atau reng tengah hanya di gelombang kedua dan ketiga saja. Lalu lanjutkan ke purlin atau reng berikutnya. (lihat gambar 7)

Lakukan pembautan disisi paling belakang, dimulai dari gelombang kedua, ketiga dan keempat. Lanjutkan mengangkat lembaran Twinlite Greca yang kedua.

Lakukan pemasangan baut di gelombang satu, dua, tiga dan empat, untuk purlin depan dan belakang. Dan gelombang satu dan tiga untuk purlin tengah. Selesaikan semua pemasangan baut hingga semua lembar terpasang.

cara pasang kanopi twinlite greca pasang baut

06 PASANG COVER

Pasang cover Twinlite Greca dari sisi kanan rangka. Gunakan Sealant Neutral OCI N-192 sebagai perekat cover Twinlite Greca. (lihat gambar 8)

cara pasang kanopi twinlite greca cover sealant oci

PERSIAPAN AKHIR

Bila sisi belakang berhadapan dengan tembok, maka gunakan flashing untuk mencegah kebocoran.

  1. Baut di sisi belakang Twinlite Greca dilepas.
  2. Buat alur atau tali air ditembok dengan kedalaman 1-2 cm untuk memasukkan karpet flashing.
  3. Potong karpet flashing sepanjang area yang akan dipasang.
  4. Pasang baut di sisi belakang, mengikat karpet flashing.
  5. Oleskan Sealant Neutral OCI N-192 di sisi atas yang menghadap tembok di karpet flashing.

Pastikan semua profil dan baut sudah terpasang lengkap.

cara pasang mudah kanopi twinlite

ANY FURTHER QUESTIONS?

For further information on our products, please simply fill in the form below and our representative will respond to you as soon as possible.

CHECK OUR OTHER PRODUCTS